简介

[UInt8]是Swift中的数组类型,也是作用比较特殊的一种数组类型, 常用于底层交互与内存操作与管理。如: 字符串编解码, 充当字节缓冲区等等

字符串编解码

  • [UInt8](或[Int8])转 String

String有对应的直接从[UInt8][Int8]转换成String的构造函数

1
2
3
4
5
6
/// "这是一个字符串" 的utf8编码
let bytes: [UInt8] = [232, 191, 153, 230, 152, 175, 228, 184, 128, 228, 184, 170, 229, 173, 151, 231, 172, 166, 228, 184, 178]
/// 转换成字符串
if let msg = String(bytes: bytes, encoding: .utf8) {
print(msg)
}
  • String[UInt8](或[Int8]

String[UInt8][Int8]时需要借助中间角色Data

1
2
3
4
5
6
let msg = "这是一个字符串"

if let data = msg.data(using: .utf8) {
let bytes = [UInt8](data)
print(bytes)
}

底层交互

1. 转换到C语言中的const char*, char*, void*,const void*

这里的转换指的是使用同一块内存地址

指针类型对应关系

C语言指针类型 swift语言指针对象类型
char * UnsafeMutablePointer<Int8>
const char * UnsafePointer<Int8>
unsigned char * UnsafeMutablePointer<UInt8>
const unsigned char * UnsafePointer<UInt8>
void * UnsafeMutableRawPointer
const void * UnsafeRawPointer

几种特殊的指针类型

  • UnsafeRawBufferPointer
  • UnsafeMutableRawBufferPointer
  • UnsafeBufferPointer<T>
  • UnsafeMutableBufferPointer<T>

这些带有Buffer的指针类型, 可以理解为对应的不带Buffer的指针类型加上了缓冲区大小, 比如:

UnsafePointer<Int> 对应 const int *, 表示仅有地址

那UnsafeBufferPointer<Int>对应 const int * 加 size, 表示该地址与内存大小所对应的一块缓冲区

[UInt8][Int8] 转换到 const unsigned char*const char *

[UInt8] -> UnsafeRawBufferPointer -> UnsafeBufferPointer<UInt8> -> UnsafePointer<UInt8> (Int8同理)

1
2
3
4
5
6
7
8
9
10
11
/// 0. 原始字节数据 8字节
let buffer = [UInt8](repeating: 0, count: 8)

/// 1. [UInt8] -> UnsafeRawBufferPointer
let unsafeRawBufferPointer = buffer.withUnsafeBytes { $0 }

/// 2. UnsafeRawBufferPointer -> UnsafeBufferPointer<UInt8>
let unsafeBufferPointer = unsafeRawBufferPointer.bindMemory(to: UInt8.self)

/// 3. UnsafeBufferPointer<UInt8> -> UnsafePointer<UInt8>
let unsafePointer = unsafeBufferPointer.baseAddress

其中 步骤1步骤2可以合并

1
2
3
4
5
6
7
8
/// 0. 原始字节数据 8字节
let buffer = [UInt8](repeating: 0, count: 8)

/// 1. [UInt8] -> UnsafeBufferPointer<UInt8>
let unsafeBufferPointer = buffer.withUnsafeBufferPointer {$0}

/// 2.. UnsafeBufferPointer<UInt8> -> UnsafePointer<UInt8>
let unsafePointer = unsafeBufferPointer.baseAddress

[UInt8][Int8]转换到 unsigned char *char *

[UInt8] -> UnsafeMutableRawBufferPointer -> UnsafeMutableBufferPointer<UInt8> -> UnsafeMutablePointer<UInt8> (Int8同理)

1
2
3
4
5
6
7
8
9
10
11
/// 0. 原始字节数据 8字节
var buffer = [UInt8](repeating: 0, count: 8)

/// 1. [UInt8] -> UnsafeMutableRawBufferPointer
let unsafeMutableRawBufferPointer = buffer.withUnsafeMutableBytes { $0 }

/// 2. UnsafeMutableRawBufferPointer -> UnsafeMutableBufferPointer<UInt8>
let unsafeMutableBufferPointer = unsafeMutableRawBufferPointer.bindMemory(to: UInt8.self)

/// 3. UnsafeMutableBufferPointer<UInt8> -> UnsafeMutablePointer<UInt8>
let unsafeMutablePointer = unsafeMutableBufferPointer.baseAddress

其中的步骤1和步骤2也是可以合并的

1
2
/// [UInt8] -> UnsafeMutableBufferPointer<UInt8>
let unsafeMutableBufferPointer = buffer.withUnsafeMutableBufferPointer {$0 }

[UInt8][Int8]转换成const void *或者void *

在上述的步骤里, 在步骤1得到的unsafeMutableRawBufferPointer就可以通过该对象的baseAddress字段就能获取到对应的void *

如:

1
2
3
4
5
/// 获取 const void *
let unsafeRawPointer = unsafeRawBufferPointer.baseAddress

/// 获取void *
let unsafeMutableRawPointer = unsafeMutableRawBufferPointer.baseAddress

2. 从C语言中的const char * , char *, const unsigned char *, unsigned char *, const void *, void *对应缓冲区的数据创建 Data

1
2
3
4
5
6
7
8
9
/// 这里是示例, 类型为 UnsafeMutablePointer<Int8>, 也就是 char *
/// message可能来自任何C语言的接口
let message = strerror(errno)

/// 通过指针和大小来构造 UnsafeBufferPointer<Int8>
let unsafeBufferPointer = UnsafeBufferPointer<Int8>(start: message, count: strlen(msg!))

/// 构造Data
let data = Data(buffer: unsafeBufferPointer)

3. 从Data得到 [UInt8] 或者 [Int8]以及String

  • Data其实内部就是[UInt8],在大部分情况下都可以直接当成[UInt8]来使用, 字节的append,remove, insert, find等等都有相同的操作
  • 但是如果需要拷贝出来一份 [UInt8]或者[Int8],可以使用map函数
1
2
3
4
5
6
7
8
/// 缓冲区里的数据    
let data = Data(buffer: unsafeBufferPointer)

/// [UInt8]
let u8a = data.map {$0}

/// [Int8]
let s8a = data.map {Int8($0)}
  • String也自带从data数据的构造函数
1
let text = String(data: data, encoding: .utf8)

下载与安装

进入官网下载页面

找到对应平台的下载链接, 比如:

macOS平台

Windows平台Visual C++ 32/64-bit

Windows平台mingw

接口说明

基础接口

初始化与退出(SDL.h)

SDL_Init

  • 接口定义:
1
int SDL_Init(Uint32 flags);
  • 功能说明

初始化SDL的各个子系统

  • 参数说明:

flags: 子系统初始化使能标志位, 可以使用如下表所示枚举值进行或操作

枚举值 子系统
SDL_INIT_AUDIO 音频子系统
SDL_INIT_EVENTS 事件子系统
SDL_INIT_TIMER 定时器子系统
SDL_INIT_VIDEO 图形图像子系统
SDL_INIT_JOYSTICK 游戏摇杆子系统
SDL_INIT_HAPTIC 触觉子系统
SDL_INIT_CAMECONTROLLER 游戏控制器子系统(包含摇杆子系统)
SDL_INIT_EVERYTHING 所有子系统
  • 返回值说明:

0: 成功

< 0: 失败错误码, 可以通过SDL_GetError()获取错误信息

  • 示例代码:
1
2
3
4
5
6
7
8
9
10
11
#include <SDL2/SDL.h>

int main(int argc, char** argv) {

if (SDL_Init(SDL_INIT_EVERYTHING)) {
SDL_Log("SDL Initialize failed: %s", SDL_GetError());
return -1;
}

return 0;
}

SDL_InitSubSystem

  • 接口定义
1
int SDL_InitSubSystem(Uint32 flags)
  • 功能说明

    初始化SDL指定的子系统

  • 参数说明 (同 SDL_Init)

  • 返回值说明(同SDL_Init)

  • 示例代码

1
2
3
4
5
6
7
8
9
10
11
int main(int, char**) {
// ...
SDL_Init(SDL_INIT_VIDEO);
// ...

SDL_InitSubSystem(SDL_INIT_JOYSTICK);
// ...

SDL_Quit();
return 0;
}

SDL_Quit

  • 接口定义
1
void SDL_Quit();
  • 功能说明

清理所有初始化的的子系统

  • 示例代码
1
2
3
4
5
6
7
8
9
10
11
int main(int,char**) {
if(SDL_Init(SDL_INIT_EVERYTHING)) {
SDL_Log("SDL Initialize failed: %s", SDL_GetError());
return -1;
}
// ...

SDL_Quit();

return 0;
}

SDL_QuitSubSystem

  • 接口定义
1
void SDL_QuitSubSystem(Uint32 flags)
  • 功能说明

关闭指定子系统

  • 参数说明

flags: 同SDL_Init

  • 示例代码
1
2
3
4
5
6
7
8
9
10
11
12
13
14
int main(int, char**) {
auto sdl_initialized = SDL_Init(0) == 0;

if (sdl_initialized and SDL_InitSubSystem(SDL_INIT_VEDIO)) {
// ...
SDL_QuitSubSystem(SDL_INIT_VEDIO);
}

// others subsysyem ...

if (sdl_initialized) SDL_Quit();

return 0;
}

SDL_SetMainReady

  • 接口定义
1
void SDL_SetMainReady();
  • 功能说明

当不使用SDL_main函数作为入口函数时, 使用此函数来规避SDL_Init失败

  • 示例代码
1
2
3
4
5
6
7
8
int main(int, char**) {
SDL_SetMainReady();
SDL_Init(SDL_INIT_EVERYTHING);

// ...
SDL_Quit();
return 0;
}

SDL_WasInit

  • 接口定义
1
Uint32 SDL_WasInit(Uint32 flags);
  • 功能说明

获取已初始化的子系统掩码

  • 参数说明

flags: 同SDL_Init

  • 返回值说明

flags为0的时候, 返回所有已初始化子系统的掩码。

否则返回指定子系统的初始化状态

SDL_WinRTRunApp

  • 接口定义
1
int SDL_WinRTRunApp(MainFunction main_func, void *reserved);
  • 功能说明

初始化和启动SDL/WinRT 应用程序

  • 参数说明

main_func: C风格的main函数的函数类型 int MainFunction(int,char **)

  • 返回值说明

0: 成功

-1: 失败, 可以通过SDL_GetError()获取错误信息

配置变量(SDL_hints.h)

错误处理(SDL_error.h)

SDL_GetError()

  • 接口定义
1
const char* SDL_GetError();
  • 功能说明

获取错误消息

  • 返回值说明

有错误时, 返回长度非零的字符串首地址, 否则对应的字符串长度为0

  • 示例代码
1
2
3
4
5
6
7
8
9
10
int main(int, char**) {
if (SDL_Init(SDL_INIT_EVERYTHING)) {
SDL_Log("SDL initialize failed: %s", SDL_GetError());
return -1;
}

// ...
SDL_Quit();
return 0;
}

SDL_ClearError()

  • 接口定义
1
void SDL_ClearError();
  • 功能说明

清除已有错误

  • 示例代码
1
2
3
4
5
auto error  = SDL_GetError();
if (error[0]) {
SDL_Log("SDL error: %s", error);
SDL_ClearError();
}

SDL_SetError()

  • 接口定义
1
int SDL_SetError(const char*fmt, ...);
  • 功能说明

设置错误信息

  • 参数说明

printf() 风格的格式化输入参数

  • 返回值说明

只返回 -1

  • 示例代码
1
SDL_SetError("Invalid render mode: %d", mode);

日志处理(SDL_log.h)

SDL_Log

SDL_LogCritical

SDL_LogDebug

SDL_LogError

SDL_LogGetOutputFunction

SDL_GetPriority

SDL_LogInfo

SDL_LogMessage

SDL_LogMessageV

SDL_LogResetPriorities

SDL_LogSetAllPriority

SDL_LogSetOutputFunciton

SDL_LogSetPriority

SDL_LogVerbose

SDL_Warn

断言(SDL_assert.h)

SDL_GetAssertionHandler

SDL_GetAssertionReport

SDL_GetDefaultAssertionHandler

SDL_ResetAssertionReport

SDL_SetAssertionHandler

SDL_TriggerBreakpoint

SDL_assert

SDL_assert_paranoid

SDL_assert_release

版本查询(SDL_version.h)

SDL_COMPILEDVERSION

SDL_GetRevision

SDL_GetRevisionNumber

SDL_GetVersion

SDL_REVISION

SDL_VERSION

SDL_VERSIONNUM

SDL_VERSION_ATLEAST

图形图像

显示与窗口管理(SDL_video.h)

SDL_CreateWindow
SDL_CreateWindowAndRenderer
SDL_CreateWindowFrom
SDL_DestroyWindow
SDL_DisableScreenSaver
SDL_EnableScreenSaver
SDL_GL_CreateContext
SDL_GL_DeleteContext
SDL_GL_ExtensionSupported
SDL_GL_GetAttribute
SDL_GL_GetCurrentContext
SDL_GL_GetCurrentWindow
SDL_GL_GetDrawableSize
SDL_GL_GetProcAddress
SDL_GL_GetSwapInterval
SDL_GL_LoadLibrary
SDL_GL_MakeCurrent
SDL_GL_ResetAttributes
SDL_GL_SetAttribute
SDL_GL_SetSwapInterval
SDL_GL_SwapWindow
SDL_GL_UnloadLibrary
SDL_GetClosestDisplayMode
SDL_GetCurrentDisplayMode
SDL_GetCurrentVideoDriver
SDL_GetDesktopDisplayMode
SDL_GetDisplayBounds
SDL_GetDisplayDPI
SDL_GetDisplayMode
SDL_GetDisplayName
SDL_GetDisplayUsableBounds
SDL_GetGrabbedWindow
SDL_GetNumDisplayModes

2D加速渲染(SDL_render.h)

SDL_ComposeCustomBlendMode
SDL_CreateRenderer
SDL_CreateSoftwareRenderer
SDL_CreateTexture
SDL_CreateTextureFromSurface
SDL_CreateWindowAndRenderer
SDL_DestroyRenderer
SDL_DestroyTexture
SDL_GL_BindTexture
SDL_GL_UnbindTexture
SDL_GetNumRenderDrivers
SDL_GetRenderDrawBlendMode
SDL_GetRenderDrawColor
SDL_GetRenderDriverInfo
SDL_GetRenderTarget
SDL_GetRenderer
SDL_GetRendererInfo
SDL_GetRendererOutputSize
SDL_GetTextureAlphaMod
SDL_GetTextureBlendMode
SDL_GetTextureColorMod
SDL_LockTexture
SDL_QueryTexture
SDL_RenderClear
SDL_RenderCopy
SDL_RenderCopyEx
SDL_RenderDrawLine
SDL_RenderDrawLines
SDL_RenderDrawPoint
SDL_RenderDrawPoints
SDL_RenderDrawRect
SDL_RenderDrawRects
SDL_RenderFillRect
SDL_RenderFillRects
SDL_RenderGetClipRect
SDL_RenderGetIntegerScale
SDL_RenderGetLogicalSize
SDL_RenderGetScale
SDL_RenderGetViewport
SDL_RenderIsClipEnabled
SDL_RenderPresent
SDL_RenderReadPixels
SDL_RenderSetClipRect
SDL_RenderSetIntegerScale
SDL_RenderSetLogicalSize
SDL_RenderSetScale
SDL_RenderSetViewport
SDL_RenderTargetSupported
SDL_SetRenderDrawBlendMode
SDL_SetRenderDrawColor
SDL_SetRenderTarget
SDL_SetTextureAlphaMod
SDL_SetTextureBlendMode
SDL_SetTextureColorMod
SDL_UnlockTexture
SDL_UpdateTexture
SDL_UpdateYUVTexture

像素格式与转换例程(SDL_pixels.h)

SDL_AllocFormat
SDL_AllocPalette
SDL_CalculateGammaRamp
SDL_FreeFormat
SDL_FreePalette
SDL_GetPixelFormatName
SDL_GetRGB
SDL_GetRGBA
SDL_MapRGB
SDL_MapRGBA
SDL_MasksToPixelFormatEnum
SDL_PixelFormatEnumToMasks
SDL_SetPaletteColors
SDL_SetPixelFormatPalette

矩形操作函数(SDL_rect.h)

SDL_EnclosePoints
SDL_HasIntersection
SDL_IntersectRect
SDL_IntersectRectAndLine
SDL_PointInRect
SDL_RectEmpty
SDL_RectEquals
SDL_UnionRect

表面创建于简单绘图(SDL_surface.h)

SDL_BlitScaled
SDL_BlitSurface
SDL_ConvertPixels
SDL_ConvertSurface
SDL_ConvertSurfaceFormat
SDL_CreateRGBSurface
SDL_CreateRGBSurfaceFrom
SDL_CreateRGBSurfaceWithFormat
SDL_CreateRGBSurfaceWithFormatFrom
SDL_FillRect
SDL_FillRects
SDL_FreeSurface
SDL_GetClipRect
SDL_GetColorKey
SDL_GetSurfaceAlphaMod
SDL_GetSurfaceBlendMode
SDL_GetSurfaceColorMod
SDL_LoadBMP
SDL_LoadBMP_RW
SDL_LockSurface
SDL_LowerBlit
SDL_LowerBlitScaled
SDL_MUSTLOCK
SDL_SaveBMP
SDL_SaveBMP_RW
SDL_SetClipRect
SDL_SetColorKey
SDL_SetSurfaceAlphaMod
SDL_SetSurfaceBlendMode
SDL_SetSurfaceColorMod
SDL_SetSurfacePalette
SDL_SetSurfaceRLE
SDL_UnlockSurface

平台相关的窗口管理(SDL_syswm.h)

SDL_GetWindowWMInfo

剪贴板处理(SDL_clipboard.h)

SDL_GetClipboardText
SDL_HasClipboardText
SDL_SetClipboardText

Vulkan支持(SDL_Vulkan.h)

SDL_Vulkan_CreateSurface
SDL_Vulkan_GetDrawableSize
SDL_Vulkan_GetInstanceExtensions
SDL_Vulkan_GetVkInstanceProcAddr
SDL_Vulkan_LoadLibrary
SDL_Vulkan_UnloadLibrary

音频

音频设备管理、音频播放与录音(SDL_audio.h)

SDL_AudioInit
SDL_AudioQuit
SDL_BuildAudioCVT
SDL_ClearQueuedAudio
SDL_CloseAudio
SDL_CloseAudioDevice
SDL_ConvertAudio
SDL_DequeueAudio
SDL_FreeWAV
SDL_GetAudioDeviceName
SDL_GetAudioDeviceStatus
SDL_GetAudioDriver
SDL_GetAudioStatus
SDL_GetCurrentAudioDriver
SDL_GetNumAudioDevices
SDL_GetNumAudioDrivers
SDL_GetQueuedAudioSize
SDL_LoadWAV
SDL_LoadWAV_RW
SDL_LockAudio
SDL_LockAudioDevice
SDL_MixAudio
SDL_MixAudioFormat
SDL_OpenAudio
SDL_OpenAudioDevice
SDL_PauseAudio
SDL_PauseAudioDevice
SDL_QueueAudio
SDL_UnlockAudio
SDL_UnlockAudioDevice

系统输入事件

事件处理(SDL_events.h)

SDL_AddEventWatch
SDL_DelEventWatch
SDL_EventState
SDL_FilterEvents
SDL_FlushEvent
SDL_FlushEvents
SDL_GetEventFilter
SDL_GetEventState
SDL_GetNumTouchDevices
SDL_GetNumTouchFingers
SDL_GetTouchDevice
SDL_GetTouchFinger
SDL_HasEvent
SDL_HasEvents
SDL_LoadDollarTemplates
SDL_PeepEvents
SDL_PollEvent
SDL_PumpEvents
SDL_PushEvent
SDL_QuitRequested
SDL_RecordGesture
SDL_RegisterEvents
SDL_SaveAllDollarTemplates
SDL_SaveDollarTemplate
SDL_SetEventFilter
SDL_WaitEvent
SDL_WaitEventTimeout

键盘支持(SDL_keyboard.h)

SDL_GetKeyFromName
SDL_GetKeyFromScancode
SDL_GetKeyName
SDL_GetKeyboardFocus
SDL_GetKeyboardState
SDL_GetModState
SDL_GetScancodeFromKey
SDL_GetScancodeFromName
SDL_GetScancodeName
SDL_HasScreenKeyboardSupport
SDL_IsScreenKeyboardShown
SDL_IsTextInputActive
SDL_SetModState
SDL_SetTextInputRect
SDL_StartTextInput
SDL_StopTextInput

鼠标支持(SDL_mouse.h)

SDL_CaptureMouse
SDL_CreateColorCursor
SDL_CreateCursor
SDL_CreateSystemCursor
SDL_FreeCursor
SDL_GetCursor
SDL_GetDefaultCursor
SDL_GetGlobalMouseState
SDL_GetMouseFocus
SDL_GetMouseState
SDL_GetRelativeMouseMode
SDL_GetRelativeMouseState
SDL_SetCursor
SDL_SetRelativeMouseMode
SDL_ShowCursor
SDL_WarpMouseGlobal
SDL_WarpMouseInWindow

游戏摇杆支持(SDL_joystick.h)

SDL_JoystickClose
SDL_JoystickCurrentPowerLevel
SDL_JoystickEventState
SDL_JoystickFromInstanceID
SDL_JoystickGetAttached
SDL_JoystickGetAxis
SDL_JoystickGetBall
SDL_JoystickGetButton
SDL_JoystickGetDeviceGUID
SDL_JoystickGetGUID
SDL_JoystickGetGUIDFromString
SDL_JoystickGetGUIDString
SDL_JoystickGetHat
SDL_JoystickInstanceID
SDL_JoystickName
SDL_JoystickNameForIndex
SDL_JoystickNumAxes
SDL_JoystickNumBalls
SDL_JoystickNumButtons
SDL_JoystickNumHats
SDL_JoystickOpen
SDL_JoystickUpdate
SDL_NumJoysticks

游戏控制器支持(SDL_gamecontroller.h)

SDL_GameControllerAddMapping
SDL_GameControllerAddMappingsFromFile
SDL_GameControllerAddMappingsFromRW
SDL_GameControllerClose
SDL_GameControllerEventState
SDL_GameControllerFromInstanceID
SDL_GameControllerGetAttached
SDL_GameControllerGetAxis
SDL_GameControllerGetAxisFromString
SDL_GameControllerGetBindForAxis
SDL_GameControllerGetBindForButton
SDL_GameControllerGetButton
SDL_GameControllerGetButtonFromString
SDL_GameControllerGetJoystick
SDL_GameControllerGetStringForAxis
SDL_GameControllerGetStringForButton
SDL_GameControllerMapping
SDL_GameControllerMappingForGUID
SDL_GameControllerName
SDL_GameControllerNameForIndex
SDL_GameControllerOpen
SDL_GameControllerUpdate
SDL_IsGameController

传感器(SDL_sensor.h)

SDL_NumSensors
SDL_SensorClose
SDL_SensorFromInstanceID
SDL_SensorGetData
SDL_SensorGetDeviceInstanceID
SDL_SensorGetDeviceName
SDL_SensorGetDeviceNonPortableType
SDL_SensorGetDeviceType
SDL_SensorGetInstanceID
SDL_SensorGetName
SDL_SensorGetNonPortableType
SDL_SensorGetType
SDL_SensorOpen
SDL_SensorType
SDL_SensorUpdate

力反馈

力反馈支持 (SDL_haptic.h)

SDL_HapticClose
SDL_HapticDestroyEffect
SDL_HapticEffectSupported
SDL_HapticGetEffectStatus
SDL_HapticIndex
SDL_HapticName
SDL_HapticNewEffect
SDL_HapticNumAxes
SDL_HapticNumEffects
SDL_HapticNumEffectsPlaying
SDL_HapticOpen
SDL_HapticOpenFromJoystick
SDL_HapticOpenFromMouse
SDL_HapticOpened
SDL_HapticPause
SDL_HapticQuery
SDL_HapticRumbleInit
SDL_HapticRumblePlay
SDL_HapticRumbleStop
SDL_HapticRumbleSupported
SDL_HapticRunEffect
SDL_HapticSetAutocenter
SDL_HapticSetGain
SDL_HapticStopAll
SDL_HapticStopEffect
SDL_HapticUnpause
SDL_HapticUpdateEffect
SDL_JoystickIsHaptic
SDL_MouseIsHaptic
SDL_NumHaptics

定时器

定时器支持(SDL_timer.h)

SDL_AddTimer
SDL_Delay
SDL_GetPerformanceCounter
SDL_GetPerformanceFrequency
SDL_GetTicks
SDL_RemoveTimer
SDL_TICKS_PASSED

多线程

线程管理(SDL_thread.h)

SDL_CreateThread
SDL_DetachThread
SDL_GetThreadID
SDL_GetThreadName
SDL_SetThreadPriority
SDL_TLSCreate
SDL_TLSGet
SDL_TLSSet
SDL_ThreadID
SDL_WaitThread

线程同步(SDL_mutex.h)

SDL_CondBroadcast
SDL_CondSignal
SDL_CondWait
SDL_CondWaitTimeout
SDL_CreateCond
SDL_CreateMutex
SDL_CreateSemaphore
SDL_DestroyCond
SDL_DestroyMutex
SDL_DestroySemaphore
SDL_LockMutex
SDL_SemPost
SDL_SemTryWait
SDL_SemValue
SDL_SemWait
SDL_SemWaitTimeout
SDL_TryLockMutex
SDL_UnlockMutex

原子操作(SDL_atomic.h)

SDL_AtomicAdd
SDL_AtomicCAS
SDL_AtomicCASPtr
SDL_AtomicDecRef
SDL_AtomicGet
SDL_AtomicGetPtr
SDL_AtomicIncRef
SDL_AtomicLock
SDL_AtomicSet
SDL_AtomicSetPtr
SDL_AtomicTryLock
SDL_AtomicUnlock
SDL_CompilerBarrier

文件系统

文件系统路径(SDL_filesystem.h)

SDL_GetBasePath
SDL_GetPrefPath

文件IO抽象(SDL_rwops.h)

SDL_AllocRW
SDL_FreeRW
SDL_RWFromConstMem
SDL_RWFromFP
SDL_RWFromFile
SDL_RWFromMem
SDL_RWclose
SDL_RWread
SDL_RWseek
SDL_RWsize
SDL_RWtell
SDL_RWwrite
SDL_ReadBE16
SDL_ReadBE32
SDL_ReadBE64
SDL_ReadLE16
SDL_ReadLE32
SDL_ReadLE64
SDL_ReadU8
SDL_WriteBE16
SDL_WriteBE32
SDL_WriteBE64
SDL_WriteLE16
SDL_WriteLE32
SDL_WriteLE64
SDL_WriteU8

1. 下载SFML的SDK

进入SFML官网的下载页下载最新稳定版的SFML SDK

选择对应的版本后,找到如下的下载链接:

下载完成后解压到指定目录

2. 安装SFML SDK的头文件和库文件

frameworks

  • 将解压目录下的Frameworks拷贝到系统目录下的 /Library/Frameworks/System/Library/Frameworks也可以, 但不建议,这个是系统相关的框架)

dylib

  • include目录拷贝到 /usr/local/(出现合并选是, 或者拷贝include目录下的所有内容拷贝到/usr/local/include目录下)
  • lib目录拷贝到/usr/local(出现合并选是, 或者拷贝include目录下的所有内容拷贝到/usr/local/lib目录下)

3. 安装SFML的依赖库

在SFML SDK的解压目录下, 还有个很重要的目录extlibs

这个目录是 SFML SDK的依赖库所在目录(其实很人性化了,毕竟没让我们自己去导出找依赖库源码来自己build)

这个安装比较简单, 但是很有必要:

extlibs下的所有.framework拷贝到 /Library/Frameworks即可

其实到这已经算是安装完成了,剩下的就是在Xcode里面使用验证安装了。但SFML SDK为我们提供了一个很有帮助的Xcode插件工具,也就是SFML 的Xcode工程模板创建引导

4. 安装Xcode工程模板

在SFML SDK解压目录下,找到templates目录, 将改目录下的SFML目录整个拷贝到 /Library/Developer/Xcode/Templates下(如果/Library/Developer/Xcode/Templates不存在就自己创建一个)。

5. 验证安装

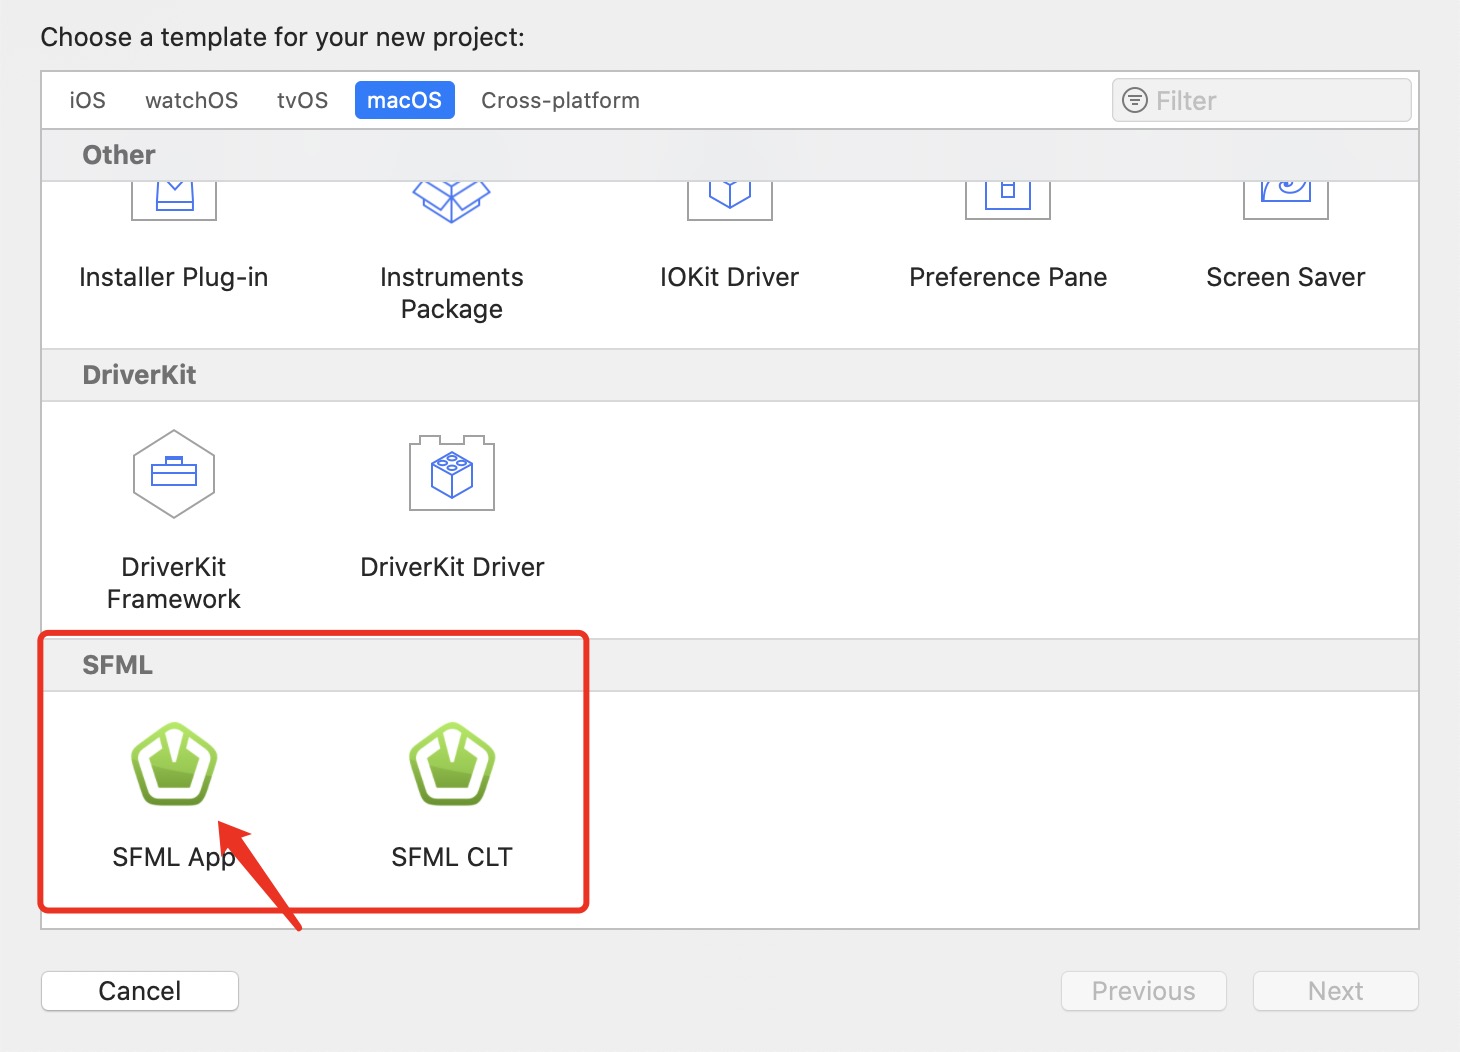
我们打开Xcode, 然后创建新工程,在工程模板选择的时候,往下拉,就会看到SFML的模板了,选择该模板,一路点击下一步即可(中间肯定会有一些命名相关的需要填的,按自己喜好填就行)

异步+超时等待的C++实现与应用

问题描述

在C++开发过程中,我们最常用的编程模式还是同步编程。原因很简单:

  • 流程简介明了,能明确知道程序的步骤流程
  • 作用域简单,能够更好的控制作用域内对象的生命周期
  • 历史原因, C++11才有的lambda表达式,是的异步编程的复杂度降低, 在此之前都比较复杂

有了C++11以后,异步形式的接口越来越多,最基本就是 std::thread, std::async之类的接口

如果我们需要在某个同步流程中去处理比较耗时的操作时, 我们的同步流程就会被堵住以至于后续的流程无法继续。如果我们在编写同步流程时,能控制这段同步代码的最大耗时, 那将是一个很有效的编程模式。

于是 异步 + 超时等待的模式营运而生

思考

  • 在C++11开始以后,我们能使用到的可以带超时等待的标准库接口都有哪些呢?

    • std::future
    • std::condition_variable
  • 可以构造std::future对象的标准库接口有哪些呢?

    • std::async
    • std::promise
    • std::packaged_task

可选方案

使用std::async

1
2
3
4
5
6
7
8
9
auto future = std::async(std::lauch::async, [=] {
/// 异步操作
/// 此处比较耗时,省略
return result;
});
if (future.wait_for(10s) == std::future_status::timeout) {
/// 此处为等待结果超时
/// 但此处的return或者抛异常等退出作用域的行为都会导致阻塞直到异步操作完成
}

注意

  1. std::async名字虽然带有async但能给人很大的误导, 使用std::async的时候, 如果没有获取返回值的future对象,那该异步函数便会成为同步函数。原因是: std::async返回的future对象由于是右值,但没有左值对象来接管该对象的生命周期, 因此在调用完std::async后,该future对象会自动析构, 析构时,会发生等待操作,一直等待异步操作的返回值,因此看起来就像是同步一样(见示例代码1)

  2. 如果获取了std::async的返回值future对象, 那std::async才能叫真正的异步调用。 这样可以在发起异步操作后立马去执行其他操作,执行完了其他必要操作再使用future对象来获取异步结果(也有可能获取不到仍需等待,见示例代码2)

  3. 使用std::async的时候, 如果异步操作的时间大于等待超时的时间,那么等待超时以后return也会阻塞到异步操作完成才会完全退出作用(见示例代码3)

示例代码1:

1
2
3
4
5
6
7
8
9
10
11
12
13
14
15
#include <iostream>
#include <future>
using namespace std::literals::chrono_literals;
int main(int, char**)
{
std::async(std::launch::async, [] {
std::cout << "这里是异步操作" << std::endl;
std::this_thread::sleep_for(1s);
std::cout << "异步操作结束" << std::endl;
});

std::cout << "这里是异步操作发起后的同步操作" << std::endl;

return 0;
}

示例代码1输出:

1
2
3
4
这里是异步操作
异步操作结束
这里是异步操作发起后的同步操作
Program ended with exit code: 0

示例代码2

1
2
3
4
5
6
7
8
9
10
11
12
13
14
15
16
17
18
19
20
21
#include <iostream>
#include <future>

using namespace std::literals::chrono_literals;

int main(int, char**)
{
auto future = std::async(std::launch::async, [] {
std::cout << "这里是异步操作" << std::endl;
std::this_thread::sleep_for(1s);
std::cout << "异步操作结束" << std::endl;
return 1000;
});

std::cout << "这里是异步操作发起后的同步操作" << std::endl;
std::this_thread::sleep_for(500ms);
auto result = future.get();
std::cout << "异步操作结果为: " << result << std::endl;

return 0;
}

示例代码2输出:

1
2
3
4
5
这里是异步操作发起后的同步操作
这里是异步操作
异步操作结束
异步操作结果为: 1000
Program ended with exit code: 0

示例代码3:

1
2
3
4
5
6
7
8
9
10
11
12
13
14
15
16
17
18
19
20
21
22
23
24
25
26
27
28
29
30
31
32
33
34
35
36
#include <iostream>
#include <future>

using namespace std::literals::chrono_literals;

double now() {
return std::chrono::duration_cast<std::chrono::duration<double>>(std::chrono::system_clock::now().time_since_epoch()).count();
}

void do_something_with_future() {
auto future = std::async(std::launch::async, [] {
std::cout << "这里是异步操作" << std::endl;
std::this_thread::sleep_for(5s);
std::cout << "异步操作结束" << std::endl;
return 1000;
});

std::cout << "这里是异步操作发起后的同步操作" << std::endl;
std::this_thread::sleep_for(500ms);
if (future.wait_for(1s) == std::future_status::timeout) {
std::cout << "等待异步结果超时" << std::endl;
return;
}
auto result = future.get();
std::cout << "异步操作结果为: " << result << std::endl;
}

int main(int, char**)
{
auto n = now();
std::cout << "还没有使用future" << std::endl;
do_something_with_future();
std::cout << "使用完future, 用时" << now() - n << "s" << std::endl;

return 0;
}

示例代码3输出:

1
2
3
4
5
6
7
还没有使用future
这里是异步操作发起后的同步操作
这里是异步操作
等待异步结果超时
异步操作结束
使用完future, 用时5.00282s
Program ended with exit code: 0

说明:

这段代码乍一看,以为耗时是500ms,其实不然, 输出的总使用耗时是5s左右。

使用std::promise

1
2
3
4
5
6
7
8
9
10
11
12
13
14
15
16
17
18
19
20
21
22
23
24
25
26
27
28
29
30
31
32
33
34
35
36
37
38
39
40
41
42
43
44
#include <iostream>
#include <future>

using namespace std::literals::chrono_literals;

double now() {
return std::chrono::duration_cast<std::chrono::duration<double>>(std::chrono::system_clock::now().time_since_epoch()).count();
}


void do_something_with_promise() {
std::promise<int> promise;

std::cout << "发起异步操作:" << std::endl;

/// 暂时用std::thread模拟下异步接口
std::thread([&] {
std::this_thread::sleep_for(5s);
promise.set_value(1000);
}).detach();

auto future = promise.get_future();

if (future.wait_for(1s) == std::future_status::timeout) {
throw std::runtime_error("等待异步结果超时");
}

auto result = future.get();
std::cout << "异步操作结果为: " << result << std::endl;
}

int main(int, char**)
{
auto n = now();
std::cout << "开始使用promise" << std::endl;
try {
do_something_with_promise();
} catch(const std::exception& e) {
std::cout << e.what() << std::endl;
}
std::cout << "使用完promise, 用时: " << now() - n << "s" << std::endl;

return 0;
}

输出:

1
2
3
4
5
开始使用promise
发起异步操作:
等待异步结果超时
使用完promise, 用时: 1.00624s
Program ended with exit code: 0

代码说明:

与std::async不同的是,std::promise拿到的future,在promise还没设置值得时候, future的析构不会被阻塞。因此如果希望等待超时以后能立马退出作用域,更推荐使用 std::promise

使用std::packaged_task

1
2
3
4
5
6
7
8
9
10
11
12
13
14
15
16
17
18
19
20
21
22
23
24
25
26
27
28
29
30
31
32
33
34
35
36
37
38
39
40
41
42
43
44
45
46
47
#include <iostream>
#include <future>

using namespace std::literals::chrono_literals;

double now() {
return std::chrono::duration_cast<std::chrono::duration<double>>(std::chrono::system_clock::now().time_since_epoch()).count();
}


void do_something_with_packaged_task() {

std::packaged_task<int()> task([] {
std::this_thread::sleep_for(5s);
return 1000;
});

std::cout << "发起异步操作:" << std::endl;

/// 使用std::thread模拟异步接口
std::thread([&] {
task();
}).detach();

auto future = task.get_future();

if (future.wait_for(1s) == std::future_status::timeout) {
throw std::runtime_error("等待异步结果超时");
}

auto result = future.get();
std::cout << "异步操作结果为: " << result << std::endl;
}

int main(int, char**)
{
auto n = now();
std::cout << "开始使用packaged_task" << std::endl;
try {
do_something_with_packaged_task();
} catch(const std::exception& e) {
std::cout << e.what() << std::endl;
}
std::cout << "使用完packaged_task, 用时: " << now() - n << "s" << std::endl;

return 0;
}

输出:

1
2
3
4
5
开始使用packaged_task
发起异步操作:
等待异步结果超时
使用完packaged_task, 用时: 1.00114s
Program ended with exit code: 0

代码说明:

其实std::packaged_task可以看成是std::function与std::promise的结合体, 可以理解为把一个 返回值为T类型的std::function的返回值存到内部的std::promise后,可以通过future获取到返回值

使用std::condition_variable

使用std::condition_variable的思路是:

将异步操作的参数类型做一份拷贝,并和结果类型放在一起进行包装,创建一份包裹对象, 并在包裹对象内部使用 std::mutex和std::condition_variable对结果的访问加上条件限制。在包裹对象设置了结果值时,解除条件限制。因此可以利用 std::condition_variable的wait系列接口来限时等待或者无限等待结果的功能

综合使用示例代码

1
2
3
4
5
6
7
8
9
10
11
12
13
14
15
16
17
18
19
20
21
22
23
24
25
26
27
28
29
30
31
32
33
34
35
36
37
38
39
40
41
42
43
44
45
46
47
48
49
50
51
52
53
54
55
56
57
58
59
60
61
62
63
64
65
66
67
68
69
70
71
72
73
74
75
76
77
78
79
80
81
82
83
84
85
86
87
88
89
90
91
92
93
94
95
96
97
98
99
100
101
102
103
104
105
106
107
108
109
110
111
112
113
114
115
116
117
118
119
120
121
122
123
124
125
126
127
128
129
130
131
132
133
134
135
136
137
138
139
140
141
142
143
144
145
146
147
148
149
150
151
152
153
154
155
156
157
158
159
160
161
162
163
164
165
166
167
168
169
170
171
172
173
174
175
176
177
178
179
180
181
182
183
184
185
186
187
188
189
190
191
192
193
194
195
196
197
198
199
200
201
202
203
204
205
#include <string>
#include <iostream>
#include <condition_variable>

#include <thread>
#include <future>

namespace std_srvs {
struct SetIntegerRequest {
int64_t data;
};

struct SetIntegerResponse {
bool success;
std::string message;
};


struct SetInteger {
using Request = SetIntegerRequest;
using Response = SetIntegerResponse;

Request request;
Response response;
};

}

template<typename MREQ, typename MRES>
struct Wrapper {
using Request = MREQ;
using Response = MRES;

Wrapper(const Request& req)
: m_request(req)
, m_response() {

}

const Request& request() const {
return m_request;
}

const Response& response() const {
return m_response;
}

Response& response() {
return m_response;
}

void wait() {
std::unique_lock<std::mutex> lock(m_reponse_lock);
m_response_ready.wait(lock);
}

template<typename Rep, typename Period>
std::cv_status wait_for(const std::chrono::duration<Rep, Period>& duration) {
std::unique_lock<std::mutex> lock(m_reponse_lock);
return m_response_ready.wait_for(lock, duration);
}

template<typename Clock, typename Duration>
std::cv_status wait_until(const std::chrono::time_point<Clock, Duration>& time_point) {
std::unique_lock<std::mutex> lock(m_reponse_lock);
return m_response_ready.wait_until(lock, time_point);
}

void accept() {
std::unique_lock<std::mutex> lock(m_reponse_lock);
m_response_ready.notify_all();
}

private:
Request m_request;
Response m_response;

std::mutex m_reponse_lock;
std::condition_variable m_response_ready;
};

template<typename MREQ, typename MRES>
struct PromiseWrapper {
using Request = MREQ;
using Response = MRES;

PromiseWrapper(const Request& req): m_request(req) {

}

std::future<Response> get_future() {
return m_response.get_future();
}

const Request& request() const {
return m_request;
}

void set_response(Response response) {
m_response.set_value(std::move(response));
}

private:
Request m_request;
std::promise<Response> m_response;
};


bool handle(const std_srvs::SetInteger::Request& request, std_srvs::SetInteger::Response& response) {

auto wrapper = std::make_shared<Wrapper<std_srvs::SetInteger::Request, std_srvs::SetInteger::Response>>(request);


/// 这里发起异步任务
std::thread([=] {


/// 模拟长时间,可以尝试将此处的时间和超时等待时间的长短交换看看结果
std::this_thread::sleep_for(std::chrono::seconds(5));

wrapper->response().success = true;
wrapper->response().message = "success" + std::to_string(wrapper->request().data);

wrapper->accept(); /// 接受任务结果

}).detach();


/// 这里等待异步任务的结果
if (wrapper->wait_for(std::chrono::seconds(1)) == std::cv_status::no_timeout) {
response = wrapper->response();
} else {
response.success = false;
response.message = "timeout";
}

return true;
}

bool promise_handle(const std_srvs::SetInteger::Request& request, std_srvs::SetInteger::Response& response) {

auto wrapper = std::make_shared<PromiseWrapper<std_srvs::SetInteger::Request, std_srvs::SetInteger::Response>>(request);
/// 这里发起异步任务
std::thread([=] {


/// 模拟长时间,可以尝试将此处的时间和超时等待时间的长短交换看看结果
std::this_thread::sleep_for(std::chrono::seconds(5));

std_srvs::SetInteger::Response r;
r.success = true;
r.message = "success" + std::to_string(wrapper->request().data);

wrapper->set_response(std::move(r)); /// 接受任务结果

}).detach();

auto future = wrapper->get_future();
if (future.wait_for(std::chrono::seconds(1)) == std::future_status::timeout) {
response.success = false;
response.message = "promise timeout";
} else {
response = future.get();
}

return true;
}

void handle_test() {
std_srvs::SetInteger srv;

std::cout << "start: " << std::chrono::system_clock::now().time_since_epoch().count() << std::endl;
handle(srv.request, srv.response);
std::cout << "end : " << std::chrono::system_clock::now().time_since_epoch().count() << std::endl;

if (srv.response.success) {
std::cout << srv.response.message << std::endl;
} else {
std::cerr << srv.response.message << std::endl;
}
}

void promise_handle_test() {
std_srvs::SetInteger srv;

std::cout << "start: " << std::chrono::system_clock::now().time_since_epoch().count() << std::endl;
promise_handle(srv.request, srv.response);
std::cout << "end : " << std::chrono::system_clock::now().time_since_epoch().count() << std::endl;

if (srv.response.success) {
std::cout << srv.response.message << std::endl;
} else {
std::cerr << srv.response.message << std::endl;
}
}


int main(int, char**)
{

handle_test();
promise_handle_test();

return 0;
}

代码说明

  1. 首先是Wrapper/PromiseWrapper类, 用于将同步处理中的请求参数进行包裹并作为异步参数。 对请求与相应进行包裹的目的,在于延长异步处理时的请求参数与相应参数的生命周期,使其在服务回调已经结束的情况下,仍旧有自己的生命周期,只有在服务结束并且异步处理也结束的情况下包裹的对象的生命周期才会结束
  2. Wrapper类使用的是条件变量(std::condition_variable)技术来实现等待, PromiseWrapper使用的是 std::promise技术来实现等待
  3. 两个同步性质的服务处理函数handle/promise_handle,其中handle使用的是Wrapper技术, promise_handle用的是PromiseWrapper技术
  4. 两种方式都有一个共同点, 都可以等待制定的时间后以超时错误结束服务处理流程

应用场景

rosservice的服务程序

  • rosservice的服务程序不能阻塞,一旦阻塞,变回引起调用方连锁阻塞,会使系统进入僵死状态

预备篇

编程技术预备知识

二进制、十进制、十六进制

  1. 十进制思想n进制思想的转化
  2. 二进制十进制十六进制的书面表示, 比如:15, 二进制: 0b00001111, 十进制: 15, 十六进制: 0x0F
  3. 进制之间的转化

流程图

  1. 顺序结构
  2. 条件分支结构
  3. 循环结构

常见术语

  1. 编辑器: 用来编写代码的工具,比如vim vscode nodepad nodepad++ sublime text atom
  2. 编译器: 用来将源码装换为库文件和可执行二进制文件的命+令行工具套件, 比如 gcc, g++, cl.exe, clang, clang++
  3. 项目构建: 管理项目源码与编译生成脚本的工具软件, 比如 make, cmake, scons, gradle, maven
  4. IDE: 集成了编辑器编译器调用自动化项目构建自动化的一种功能更强大的软件, 比如QtCreator, XCode, Visual Studio, Clion, Code Blocks, Eclipse

C++开发环境安装

Windows平台环境安装

  1. winddows系统下环境安装(Visual Studio)
  2. WSL(Windows Subsystem Linux)下环境安装

Ubuntu(linux平台)环境安装

1
sudo aptitude install build-essential git cmake qtcreator

macOS平台环境安装(XCode安装)

打开AppStore, 搜索 Xcode, 找到右侧的Xcode 点击 获取, 待 获取变为 安装后, 点击安装

IDE的选择

Windows:

  • Visual Studio Community/Professional/Ultimate (Windows平台开发必备)
  • Visual Studio Code (跨平台可扩展的编辑器, 可以配置成像IDE一样功能强大)
  • QtCreator
  • Clion

Linux:

  • Visual Studio Code
  • QtCreator
  • Clion
  • Code Blocks

macOS:

  • XCode
  • Clion
  • Visual Studio Code
  • QtCreator

入门篇

语法

语句

  1. 使用一部分参数经过特定的计算规则得到特定结果(可以没有结果值)的一句话, 通每行一条语句, 英文分号(;)结尾(仅当前C/C++语言, 部分其他编程语言语句法则不一样,有的无需分号结尾, 有的可有可无)

  2. 示例:

1
和 等于 参数1 + 参数2 +...+ 参数n

C/C++代码

1
2
1 + 2 + 3;
10 * 5 / 2 + 6 / 3;

变量

  1. 当我们需要临时保存记录下某个语句的结果时, 变量就应运而生了, 比如
1
2
int sum = 1 + 2 + 3;
int result = 10 * 5 / 2 + 6 / 3;
  1. 为什么要用变量呢?比如, 你有100元人民币, 早上买早餐用掉10元,中午买午餐又花掉了20元, 晚上没忍住多吃了点, 花了50, 那么请问,你早上、中午、晚上分别剩下多少钱呢?

不用变量时:

1
2
3
4
5
6
7
/// 一开始100RMB

100 - 10; /// 这是早上剩余的

100 - 10 - 20; ///这是中午剩余的

100 - 10 - 20 - 50; ///这是晚上剩下的

现在我们使用变量:

1
2
3
4
5
6
7
int total = 100; /// 一开始的100RMB

total = total - 10; /// 早上用掉10元, 剩下 total - 10 , 然后在吧剩下的值记录到total, 此时的total才是真正意义上的剩下的钱

total = total - 20; /// 在早上剩下的基础上中午再花20元, 剩下的再次记录到total

total = total - 50; /// 中午剩下的钱晚上再划掉 50元

对比发现:

  • 当没有使用变量时, 如果是在同一个概念上的数值有变动, 每次变动都要把完整的变动过程写一遍,变动的次数越多, 书写的过程越繁琐, 如此下去,简直灭绝人性
  • 使用了变量以后, 我们不仅可以把变量当成我们的原始数值一样进行计算, 还能把计算的结果进行保存留到后续的变动,而且不管多少次的变动, 计算表达式的语句也能一直保持很简洁
  1. 变量与变量有时候是会有区别的, 比如你18岁, 身高1.60米, 名字叫二愣子, 这种变量与变量之间的区别叫 变量类型18岁: 这是个整数, 1.60米: 这是实数,二愣子:这是文本也叫字符串

  2. 变量有哪些类型呢? 基本的变量类型有以下几种:

  • 整形: 对应整数
  • 浮点型: 对应实数
  • 布尔型: 表示具有对立属性的状态, 一般可以表示为/, 0 < 1 真, 1 == 2 假
  • 字符型: 用来表示显示在屏幕上给我们看的文本
  1. 变量类型的具体C/C++语言中的类型有哪些呢?
  • 整形: (unsigned ) char/short/int/long/long long
  • 浮点型: float, double
  • 布尔型: bool
  • 字符型: char , wchar
  1. 有啥区别? 每种大类型里面的具体类型之间, 一般都只有存储空间和符号性的区别, 比如
  • 整形:
1
2
3
4
5
char (1字节, -2^7~2^7-1), unsigned char (1字节, 0~2^8-1)
short(2字节,-2^15~2^15-1), unsigned char(2字节, 0~2^16-1)
int (4字节, -2^31~ 2^31-1), unsigned int(4字节, 0~2^32-1)
long/ unsigned long(平台相关,一般不小于4字节,不大于 long long 的字节数)
long long (8字节, -2^63~2^63-1), unsigned long long(8字节, 0~2^64-1)
  • 浮点型:
1
float(4字节), double(8字节)
  • 布尔型:
1
bool(1字节), 只有两个值, true: 真,false: 假
  • 字符型(使用单引号引用起来的单个内容):
    1
    2
    char(1字节): 'A', 'B', '0' ...
    wchar_t(2字节): L'A', L'B', L'C'...
  1. 基本类型之间可否转换?
  • 整形 -> 布尔型:
1
2
0: false
0: true
  • 整形 -> 浮点型:
1
2
3
0 -> 0.0f, 0.0
1 -> 1.0f, 0.0
n -> n.0f, n.0
  • 浮点数 -> 整数, 直接取整数部分, 小数部分会直接丢弃, 因此可能会有精度损失, 比如1.5转化为int以后值为1, 并且不会有像我们数学意义上的四舍五入发生

操作符

  1. 操作符分为 一元操作符、二元操作符、三元操作符, 所谓的元, 就是参数,一元表示只有一个参数…以此类推
  2. 一元操作符: -(取负, a = 1, -a = -1) ~(按位取反, ~0b00000000 = 0b11111111) !(逻辑取反, !true = false, !false = true)
  3. 二元操作符: +-*/<><=>=== (相等)、!=(不等) 、<<(左移或者流输出)、>>(右移或者流输入) 、+= (自增)、-=(自减)、*=/=&(位与)、|(位或)、^(异或)、&&(逻辑与)、||(逻辑或) 、&=|=<<=>>=
  4. 三元操作符: ?:(用法, 条件 ? 值1: 值2, 表达含义: 条件成立时, 返回值1, 不成立则返回值2)

函数

  1. 如果从某些已有的值,计算得到某个结果值, 需要执行的语句超过1条时, 我们要怎么做呢?比如计算一个两个实数和的小数部分:

如果直接把每一组都计算一遍

1
2
3
4
5
6
7
8
9
double sum = 1.5 + 2.1; /// 结果为 3.6
int part = sum; /// 自动忽略小数部分
double result1 = sum - part; /// 3.6 - 3 = 0.6

///...中间还有很多组

double sum = 9.5 + 0.7; /// 结果为 10.2
int part = sum; /// 自动忽略小数部分
double resultn = sum - part; /// 10.2- 10 = 0.2

改为使用函数

1
2
3
4
5
6
7
8
9
10
double calc(double a, double b)
{
double sum = a + b;
int part = sum; /// 自动忽略小数部分
return sum - part; ///
}

double result1 = calc(1.5, 2.1); /// 结果0.6
/// ...
double resultn = calc(9.5, 0.2); /// 结果时0.2

其中的calc便叫做函数, 所谓函数, 其实就是特定流程的多条语句的包装,使用函数可以避免编写大量重读的代码

  1. 函数的声明与定义
  • 函数声明: 告知下文函数的形式, 一般可以编写成
1
返回类型 函数名(参数1类型 参数1名称, ..., 参数n类型 参数名称);

比如上面的calc函数:

1
double calc(double a, double b);

返回类型是double, 有2个参数, 第一个参数名叫 a, double 类型, 第二个参数名叫b, 也是double类型

  • 函数定义: 函数的具体内容, 形式大致为:
1
2
3
4
返回值 函数名(参数1类型 参数1名称, ... , 参数n类型 参数n名称)
{
具体实现细节,...
}

比如上面的 calc函数的定义:

1
2
3
4
5
6
double calc(double a, double b)
{
double sum = a + b;
int part = sum; /// 自动忽略小数部分
return sum - part; ///
}

注意: 同一个函数, 只能定义一次, 但是可以在多处声明

  1. 只有 返回值、函数名、参数的类型、个数、位置完全一致的情况下,才能被称为同一个函数
1
2
3
4
5
6
7
8
9
int add(int a, int b);
// 与
int add(int c, int d);
// 是同一个函数

bool check(double a, int b);
// 与
double check(int a, bool b, char c);
// 不是同一个函数
  1. 在C中, 同一个函数名只能用在一个函数中,不支持使用同一个函数名字定义多个函数, 但是C++中却可以同一个函数名用于多个函数, 叫做函数重载, 比如:
1
2
3
4
5
6
7
8
9
10
11
12
13
14
15
int max(int a, int b) 
{
return a < b ? b: a;
}

double max(double a, double b)
{
return a < b ? b : a;
}
//虽然用的函数名都是max
//但是
max(1, 2);
// 与
max(2.0, 3.0);
// 使用的不是同一个函数

类型转换

原生数组

指针

枚举、 结构体、联合体

常量

提高篇

进阶篇

高级篇